
Some ideas on Astrophotography with a Mobile

Astrophotography is photographing objects in the night sky such as the moon, the planets, constellations etc. These objects are pretty dim, except for the moon. This presents certain challenges and therein lies the fun. Advanced amateurs often use digital cameras with manual settings to overcome these challenges. Here I am going to talk about beginners who have only a decent mobile camera to work with. I assume a minimum of 32 megapixel camera with an app allowing for manual settings for exposure, ISO, etc. And yes, this piece is for the completely uninitiated, hence the simple language.

The challenges with a mobile camera

  • Objects being dim means that they give very little light compared to daylight. Although our eyes can see them (because by some accounts, our eyes are a few hundred Gigapixel cameras) the camera sensors cannot. This often results in the object being invisible in the photograph.
  • Objects being small makes it difficult for the sensors to pick up the light. Camera sensors can be thought of as tiny buckets or glasses kept in the rain. Each bucket will catch only those raindrops which fall upon it. The tinier the mouth of the bucket, the lesser the rain it will catch. Now the rain here, is light. If the rain (light) is only pouring from a small nozzle above a particular bucket, other buckets won't catch it. This is what happens with a small object. The light falls on only a few sensors of the camera and affect them. So, why not zoom it?
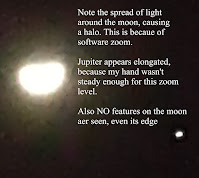
  • Software zoom is not the same as a real zoom lens. A lens which converges light onto a small region, gathers as much light as the lenses' aperture (diameter). A large lens collects more light. That's the telescope for example. Mobile lenses in particular are tiny. The software zoom features allow for a manipulation of the RAW picture that the camera captures. This means that the pixels
    upon which light is not being received, are given artificial signal to look illuminated
    . In simple terms, you are creating a bigger picture by simply smearing the colors of a small part, all around. This is done with a lot of sophistication and yet, it is not the real picture. So for tiny objects, this will only blur the object.
  • The background is often too bright. The mobile cameras using software automatically try to raise the brightness of the picture. The sky (dark to the eyes) is thus enhanced so that tiny fragments of light are inserted into each sensor to make the photo brighter. So if there is say one unit of light falling on the dark areas while about 100 units on the area illuminated by the object, the software upgrades these numbers to say, 5 and a 105. Thus the sky appears bright, and the object becomes over-exposed making it to lose its detail.
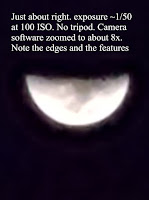
  • Hands are too shaky for a long exposure. If you try to adjust the exposure (time for which the camera sensor collects light) to something more than 1/100 of a second, your hands shake a little or a lot during this time. Imagine you are drinking water from a bottle held a little away from your mouth. If your hands are not steady, the water will go all over your face and spill on your clothes as well. The camera needs to be held rock sturdy for the time for which it is exposed to light. Failing, this, the light goes all over the sensors causing horrible effects. So, for long exposures, you need a tripod, or at least you need to sit or sleep on the ground and support your hands firmly. Typical exposure time on your cameras are between 1/500 second for broad daylight and 1/250 for cloudy conditions. Some apps have a NIGHT MODE, where the exposures are often 1/10 second or so.

So how to overcome these problems

  1. Use a tripod or firm support for your hands
  2. Use a camera app or a mobile phone which allows you to set manual settings for ISO and exposure.
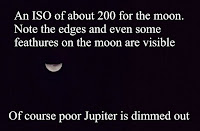
ISO Settings

ISO is short for International Standards Organization and here it refers to how fast your sensor circuits work. Let's go back to the buckets. If you are using a tiny bucket to catch the rain, you will have to empty it in a short while. If however, you use a larger bucket, it will take time to fill up. The sensor circuit can control how soon your sensor "fills up". By keeping a high value for the ISO, your sensor fills up quickly and sends the information to the software to record. A lower ISO means it takes time. 

This means that a high ISO will record even small amounts of light and catch that tiny Jupiter in a short exposure, while a smaller ISO will need a lot of exposure to capture the same amount of light. ISO settings go from 100 to 6000. 100 is good enough for regular pictures, selfies, groupfies etc as the light from the noses and pouts is more than enough to be recorded in a regular (1/500s) exposure. 400 is useful (and automatically adjusted in most apps) for a slightly dimmer picture, like nature pics that you randomly capture on a journey. Astronomical objects need something like 800 for bright planets or 3000 for visible stars while moon is over-exposed at even 200. The setting sun is too bright even for a 100 ISO setting and usually you miss getting the edges of the setting sun with your mobile camera.

Exposure

Exposure means how long your camera shutter (old analog cameras had mechanical flaps to allow light) is open and allows light from the object to fall on the sensors. The longer the exposure the more light falls on the sensor. Imagine a bucket with a cover, kept in the rain. No rain enters it unless you open the cover. If you open for a short time, only a little rain will get inside. Too long and the bucket may overflow. Long exposure to a bright object causes the photo to be over-exposed looking all whitish with no information in it. Too little exposure and you miss out most detail. If you take a picture of your aunty wearing a nose-ring, at night, with a standard (1/500) exposure, you risk getting scolded. The precious nose-ring simply won't be seen.

For astronomical purposes exposures have to be long. The Sun of course is too bright for even 1/500 second exposures and you would need lesser exposure than that, more like 1/1000 for an 100 ISO setting. However
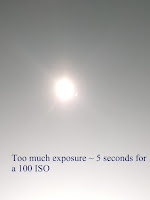
,  the moon would need about 1/100 sec for the same ISO. Jupiter would need something like 1/10 second to be barely visible. Stars even longer, like 5-10 seconds or more. Galaxies using professional cameras would need around 5-10 minutes on a regular ISO.

Finally

You surely get by now that just these two settings - ISO and exposure - can bring about great results. And it is all about mixing the values of each and trying out various combinations until you become good at it.

The idea is NOT to get a good looking picture, but rather an informative one. 


And if you really need just an artistic capture, try playing these numbers and see if you can get something like this last picture here. Happy Astronomy and Astrophotography to you all.


Comments

All Time Popular Posts

Annual Day 2023

 After a long hiatus due to covid we finally got most activities on track. The Annual Day function is always a big deal for everyone at Abhinav. It has been a tradition my mother started that the Annual Day will be not a Teacher-managed event, but a Student Initiative. Since when I was a teenager, I was part of this and today 10 years after she passed, I still strive to make it work as she would have. After some hesitation, we began working in early January. I wanted to use an outside choreographer just so that teachers will not be burdened. (They are already struggling with post-covid learning difficulties) But then, an outside guy could never do justice to the Abhinav style of doing things. We always keep in mind that the cultural program should be enjoyable to everyone in the audience and at the same time should display as many of the diverse talents that our students have, as possible.  It was a great relief that my G3 students came to the rescue. Almost all of std 9 and many of st

Are Self-Driving Cars Taking Over Humans?

- Arya Dharmadhikari(Std X, Abhinav Vidyalay) The 21st century has played an important role in the advancement of technologies. This development has even revolutionized the Automobile industry. We have developed from fuel-efficient vehicles to Hybrids and EVs and now we are enhancing self-driving vehicles. Tesla, Waymo, Volvo, GM, BMW, Mercedes are among the few companies that have started testing self-driving cars. The leading among them is Waymo, which has developed level 4 autonomy which we will discuss in the next section. So before reaching levels of autonomy we should understand what self-driving cars are and why we require them. What is a self-driving car? A self-driving car (also called an autonomous vehicle) is a car that is competent in driving itself without any human intervention. The car has sensors, cameras, lasers, radars, GPS, LIDAR through which the Artificial Intelligence senses the surrounding environment, this helps the car to navigate on its path and to detect sig

Dark Matter

  ~Anvi Patil(X th A Abhinav Vidyalay) In the universe, there is about 25% of dark matter and 70% of dark energy but only 5% of it is visible. What is Dark Matter? It is a non-luminous material, which holds two galaxies. This cannot be called a black hole because it does not bend light. Then the question arrives, as it is non-luminous, how did we detect it? As it is not visible, scientists have found indirect methods to find more about it. One such method is by using the Fermi Gamma-Ray Space Telescope . Gamma rays are released when two particles of dark matter collide, Fermi telescope can be used to detect this collision. This topic was discovered by Fritz Zwicky in the 1930s, he discovered that galaxies were rotating at a faster rate than usual. A dark region seen in the foreground of a star field. This dark region could be a dark cloud of gases like hydrogen, left over from the formation of our galaxy Dark matter is called ‘dark’ not because it is ‘black’ but because it does not